Friday 25 November 2016

How do you fit 3 Leopards in a tiny box?

Howdy all...Happy Thanksgiving to my American comrades and internet folk.  Funny enough, when I think of Thanksgiving and/or Turkey day...depending on how you call it, I have a few automatic thoughts that pop into my head.

I remember one of the most appreciated meals I've had in my life...thanks to the hospitality of the folks at the American embassy in post-war Kigali allowing a few drop-ins to share their meal.  The steamed carrots were outstanding!

And...a favourite since I was a kid...I can never let a Thanksgiving go by without thinking of this scene from WKRP in Cincinnati:

So...with those thoughts in mind...Happy Thanksgiving folks.

And now, the rest of the post...since Battlefront announced that they were expanding Team Yankee to include West Germans I have been severely pumped to get my hands on some Leopard 1's for my 4CMBG Battle Group...I will have to take a look at the Panzertruppen expansion to see how BF handles 'companies' of Leopard 1's...but my ultimate objective is to have a full Troop of Leopards along with a battery of M109's and at least 2 platoons of infantry.

Anyway, since I've been pretty pumped, I thought I'd share my thoughts as I unboxed the Leopard 1 platoon box...answer that inane question...how do you get 3 Leopards in such a tiny box...this is how...

The Box...worktable in the background...but the box looks good, nice view of the tanks...smart looking roads and fields in the behind them...very nice product placement.


The Contents...top view...unit cards bundled together...there's a card for a Recce Company HQ element, platoon element, and a Panzer Division org card.  The Leopard 1's, unlike the Leo 2's are a resin model...not plastic...with a resin hull and turret, metal main gun barrel, hatch, and machinegun.


The bottom of the box, looking up...you can see the resin cast tracks and side skirts...like their Centurion models for Vietnam and Fate of a Nation, the bulk of the tank model is resin...in this case like all of their Team Yankee kit I've seen to date, even the vehicle commanders are non-metal sculpts.  I liked the poses for the Russian commanders so far and the West Germans do not disappoint...very nice looking commanders...they will suit nicely as Canucks.


The biggest thing to remember with this box...is that while the 'big' releases for Team Yankee have been all-plastic (by big I mean those units that you need many multiples of, i.e. T72's, M1A1's, M113's, BMP's, Leopard 2's, Marder's, Chieftain's, etc.).  Why remember this? Well, the Leopard 1's put together okay...they can take some work to put together nicely...very reminiscent of pre-plastic Flames of War...the plastics released so far with Team Yankee have been very nice, and I have found them to be fairly straightforward and relatively easy to assemble...they take some time with all of the small parts, but they look sharp and all pieces fit very well together.

The Leopard 1 box is a resin beast in comparison and my main disappointment, contrary to my experience with the resin Centurion, is that the track/side skirt assembly requires a fair bit of sanding to make fit...this is necessary to make these pieces fit as flush as possible to the main hull without any gaps between the skirt and hull.


If there's a gap, you'll notice it...the tread pattern will poke out.  The pic above you can see two things, first the 'tread' pattern that you can see if there are any gaps...second, my main beef with this model.  When I unboxed this set, I had 2 boxes of Leopards.  The first box went together pretty good...took some sanding, but I was happy for the most part.

The second box was not as smooth...not only was sanding required...BUT there was no amount of sanding that I could do to make these tracks fit flush with the hull...if you look at the picture, you can see that the tread is warped/bowed.  This puppy ain't flushing at all...as you can see, it takes a fair bit of sanding to make it happen.  Unfortunately, on top of the warped treads, there were also hollow weak points in the resin itself which resulted in a couple of sink holes in the hulls...as you can see below for example. 


 Overall, I am happy with the models, they look good when built, I expect the painting process to mirror my experience for the past 10 years...and while I recognize that with any process there will be some issues (it's a given, it has happened before, it will again) I know that my email to the Battlefront customer service will mirror my previous experiences and these folks work hard to keep us gamers happy and get frustrated when we get frustrated.

So, how do I keep smiling...I think of the great customer service coming my way...and on this Turkey time of the season for my American friends...I remember my Kigali turkey dinner and am happy that a few years or so (ish) later...I can sit at home and have the luxury of having a first world problem.

Take care folks.

More to follow on this project as I get my Leo's done...and have my 4CMBG Battle Group take shape.

Monday 21 November 2016

Aaaaaaaaaaaaand...TAG...again!

Evening gaming folk,

Just as the title says...time for some more TAG...a little smaller installment this time, but definitely a continuation of the blisters that I posted a while back, here.  The paint schemes on these guys was much more 'traditional' than the last batch, but, still a lot of fun.

I wanted enough variance so that each of these figures stood out...and at the same time...a little less dramatic than the Joker.  In the end, somewhat inspired by the movie Sicario...not the whiny FBI characters (movies biggest Con...IMHO)...but instead, the Brolin led mix of kicking ass DEA/CIA/Tier 1's/Contractors (I do like it when Josh Brolin kicks ass...).

At the same time, the figs also gave me the opportunity to try out a few paint schemes at a larger scale.  For Stetson Bill, I thought I'd try my hand at painting OCP cam to see if I could replicate my success and happiness with the paint scheme that I had at 15mm...
-Khurasan Minis, Devgru figure...pretty happy with how it turned out-
 
Stetson Bill - olive drab shirt, OCP camo pants, desert yellow/Iraqi sand tactical vest, and of course a kick ass Stetson...
I'm very happy with how Bill turned out...and really, I've never met a DEA type, but in my brain, this is him...
 
Shotgun Brolin - bush cap wearing, shotgun sporting, Rhodesian (I hope I pulled it off) bush shorts stepping laid back kicking ass Government Operative - I do have an alternate version of this figure painted a few years back that I painted up as wearing white and red polkadotted boxing shorts...made me laugh and laugh...
I had never tried my hand at Rhodesian bush cam before...looking at the results...I'm not sure I've tried it yet...in many ways reminded me of trying splinter cam on German Fallschirmjagers.  Anyway, I tried my own interpretation of it...and at a larger scale.

While I'm not sure if I nailed the Rhodesian part...I am very happy with how this figure turned out.
 
Leather Del Toro - this figure presented me with a bunch of challenges.  First, I didn't want to just replicate the painting schemes of the other figures...second, I had already tried a good variance of schemes amongst the previous 7 figures...third, the figure had some pretty brutal scoring and I think some flash, on the left side of his face...
So...with that I thought lets try something different...one challenge I have is trying to match facial tones to the character I'm trying to portray.  The last thing I want is some comical oompa loompa looking halloween abomination that is horribly inaccurate (at best) or just down right f'ing ignorant (AT WORST)...
 
With Leather del Toro, I hope I've been able to do some justice to the skin tones...I really liked the idea of the leather coat...not sure why, but it just feels so counter-olive drab combat shirt that it looks awesome...really hard-assed without having to Brolin it... 
 
 
Team shots...


Sunday 20 November 2016

Fallschirjager Anti-Tank team and Big Ole DAK 88's...

Hello folks,

Another week gone by, another progress shot...this time I thought I would post some pictures of some elements that I fielded for our clubs current campaign: Operation Battleaxe - turn 1 BUT was able to get completed.

If you've seen the battle report from that turn, you might remember that this is the first time I've fielded a true infantry force...no safety nets, no vehicles.  Although they weren't DAK troops, I nonetheless fielded some of my Fallschirmjager's to give them a chance at hitting the table top.

I enjoy the look of these troops...there's a lot of detail to the fig's with personnel kit and depending on the field of battle you're trying to capture, there's certainly a lot of variance in the painting scheme for their uniforms.  I had originally started my FJ force as a Monte Cassino company, but given the breadth of theatres of action...as well as needing to field one force for multiple theatres...AND needing a handy way of distinguishing platoons I decided to paint the platoons in various themes.

The first platoon I finished was German Fallschirmjager - Monte Cassino along with some company command elements...but since I have completed a Pioneer Platoon and a recoilless rifle platoon that I painted up with Crete in mind...

For our campaign, although using FJ troops, I was using to the company org chart for DAK grunts...so I needed an early war anti-tank rifle team...so...I thought Crete would be a great setting for this team


lately when I'm gaming I seem to have some horrible tendency to clutz it up and drop a mini or two...during Cangames, one of Mike's A-10 fell prey to my clutzery...the warthog has since been repaired...however, on the campaign day...I had one of my boxes of gaming goodies fall and actually crush this team...there was much sobbing...In all truthfulness, my box of goodies was in fact a toolbox full of gaming aids, dice, etc...
 
However, when the dust was settled the two AT riflemen were bent 90 degrees to the base and the NCO, using his experience I guess, was totally fine.

I straightened the two gunners out and had one break off into my hand and the other was balancing precariously on very weak sea legs...so I got home...cursed many things...got the glue out and set about repairing the legs and repainting where needed.  I'm glad these vet's have bounced back and we should see them in action soon...

Thankfully, my DAK 88 platoon did not suffer any catastrophic events...during the game they did fairly well raising hell with Crusaders and grunts alike.  I enjoyed painting these guns up...the bases are from an older box than what is currently available...they're nice, but a little bit of a pain to complete with the pre-formed holes for the troops.  I must admit they did take some finesse and multiple repaints of the base to get figures and bases to blend with each other.

Thursday 17 November 2016

The Northern City...random pieces

Hello folks,

Just a quick post this evening...a few more odds and ends for Frostgrave gaming.  I recently picked up a Pillar of Good by Reaper along with a couple of ice spiders (I think that's what they are...they look very spidery).

I'm started to feel pretty comfortable with Reaper...they do make some very nice pieces.  The only issue that I think I have with them is that sometimes, even after a thorough wash and clean, the base coat still appears very shiny...almost waxy/tacky...

Anyway, here are a few shots. 

Hope you enjoy.


Pillar of Good...went for a very worn, very subdued look on this one...for the first coat, I put a went with bright yellow and red...then thickened up the dry brushing to show the wear and age.
 
A couple of nasty looking ice spiders...

Group shot...


Sunday 6 November 2016

Battle Report - Turn 1 Operation Battleaxe Flames of War

Howdy everyone,

In case there was any doubt...yes, I am alive and fairly well...I have taken an unexpected hiatus from the internets, more or less by accident than design.  As the new school year ramped up, my work also ramped up, and so did my volunteering...

All with the result of little time on the line...little time painting...a lot less time cataloging any progress.  So, to kickstart myself and get the blog rolling into the fall...I thought I'd post a battle report from the club last month as part of our FoW Operation Battleaxe Firestorm campaign.

It has been quite some time since I played Flames of War...I have put in a game or two of Team Yankee, but really I cannot remember the last time that I tabled down and kicked it WW2 ala FoW.

The battle ended up being a mobile battle type of fight using the counterattack scenario from the MRB...the table is split into quadrants...I was able to deploy all my forces that were not wheeled or mobile.  My opponent in the quadrant next to me, the attacker, is able to deploy their entire force.

First break for me...none of my troops were mobile...I had 2 x platoons of infantry; 2 x platoons of HMG; 1 x platoon of 5cm AT guns; 1 x platoon of 88's; and 1 x platoon of 3.7cm AT guns.  Not a good break...I hastily deployed my troops and then reread the scenario details...I had troops very far away from the open objective.  My opponent, his forces were all mobile...Crusader tank horde with lorried infantry.

...now that I have set the scene...the pics...

The wheeled fury of my opponent...2 x platoons of Crusaders with HQ elements, Firestorm infantry and Armoured cars, as well as infantry holding the line in the ville facing the DAK.

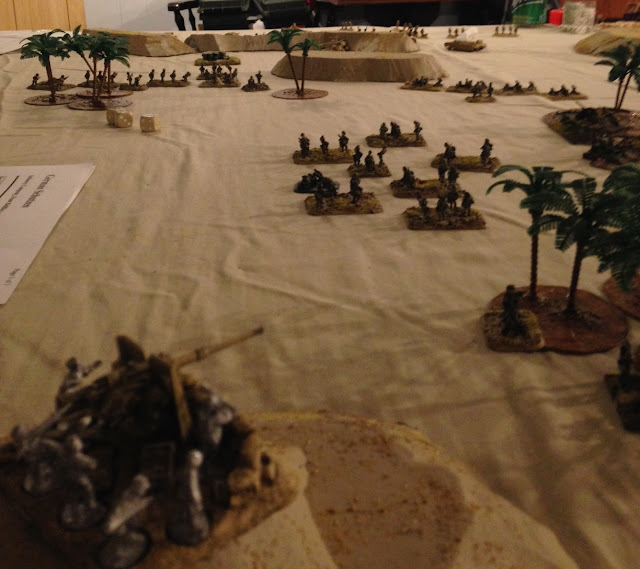
DAK deploys...from bottom to top: 3.7cm AT guns, 88 guns (one on the plain, the other on the hilltop), objective, hmg platoon on the right, infantry...on the far edge, pushing for the open objective...infantry with HMG...I placed my 5cm AT guns in ambush

looking over the battlespace...troops dug-in...you can see the Brits on the far right getting ready to accelerate hard!!

the ville to the front of the DAK lines is held by a British infantry platoon...

the open objective...not that far...but far enough

Turn 1...looks pretty similar to most of the following turns...my infantry and HMG's holding on the go line, push for the objective...I was concerned about pushing them at the double as I didn't want to loose them all in the open terrain.
 
I deployed my ambush in the oasis early so that I could still have British vehicles in range...hindsight: maybe I should have deployed the 88's in ambush and gotten their extended range.

These troops were pretty innocuous, but they bugged me because they were there...and they were too far to move and then rush into contact...and I didn't have any smoke throwing weapons...sigh...slowly attrited them over the game, but could not get them to break.

Most of the game was pushing my grunts to the objective, long range sniping by my 88's and 5cm guns...I was able to kill the formation HQ early on...I was able to pick off a Crusader platoon as well forcing them to flee the field.  The armoured cars were an annoyance...and the ridge line at the left edge of the pic provided shield for the Brits...using this ridgeline, Bernhard drove his lorried infanteers outside of the range of my guns, dismounted and marched to the ridge...

this turn, I pushed my HMG platoon from the safety of the ridge opposite the armoured cars and was in range of one of his infantry platoons that had just dismounted.  With the ville to the front of the force in a stalemate, I pushed my second infantry platoon towards the open objective

the 88 on the hilltop has a spectator's view of the action...

With the time for the game winding down...neither of us could push the other from contesting the objective...I had managed to kill one of his armoured cars...I had chewed up his infantry, but I did not have the time to keep the momentum...the game ended as a draw for us.
 
Overall, I was pretty happy...there were a couple of things I would have liked to rethink...however, it was also the first list I have ever used that did not have any armoured support.  Also, while I took some hits, I did not loose a platoon.